technicalsupport@gulfcoast.edu
850.913.3303
Activity Calendar
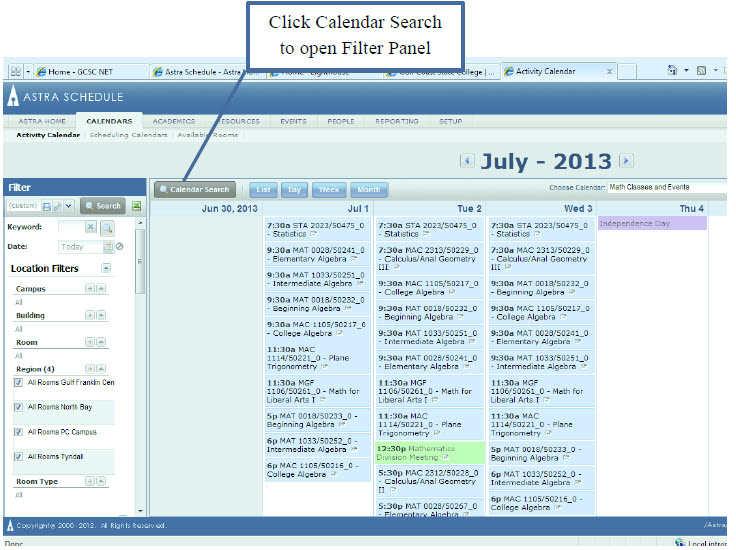
To access the Activity Calendar, click on the Calendars tab. Then click on Activity Calendar.
You may choose between different pre-defined calendars by using the Choose Calendar drop-down menu. Upon selecting a new calendar, the display will refresh with that calendar's default view and filter applied.
If the selected calendar includes more than one pre-defined filters, you may choose between the saved filters using the Filter drop-down menu.
To change the calendar view, Click on the List, Day, Week, or Month button. In both the Month and Week views of the calendar, each cell will continue to expand in size to accommodate the number of activities on a given day, up to 100. If a day has more than 100 activities, the List view can be selected to view all activities.
The List view displays a list of activities, grouped by date, starting with either the current date or the starting date of your search or previous view, as applicable. A scroll bar and paging controls are provided to navigate the list going forward.
In any format, you can use the arrow buttons to the left and right of the displayed date or date range to navigate backward or forward by the day, week, or month. You may select a specific start date through the Calendar Search Filter Options.

Events are Green. Sections pulled from Banner are in Blue. Holidays are in Purple.
Each activity displayed on the calendar includes a small info icon to the right of the activity summary. Hover your cursor over this icon to see more details about the activity, including contact information, a full description, and other meetings for the activity.
You can click on the email icon to email the activity information to someone.
You can click on the add to calendar icon to add Events information to your outlook calendar. Clicking on this icon for sections creates a separate calendar for the class and does not add it to your current Outlook Calendar.
![]()
Custom Searching and Filtering
Click the Calendar Search button to expand the Filter panel.
Keyword search, start date, and various filter choices are available within the filter panel. For individual filter choices, use the + button, if provided, to select one or more filter items from the list. Otherwise, you may toggle filter items on and off by removing or adding the check mark. Filter items may be removed by using the red X. Finally, you may use the "not equal to" option to the right of each filter type to eliminate certain choices.
Click Search to update the calendar results in its current format.
Click List to immediately jump to the List format displaying all matching activities from the start date forward. This is handy when you aren't sure when an activity is occurring or how many occurrences there are.

Saving Filters
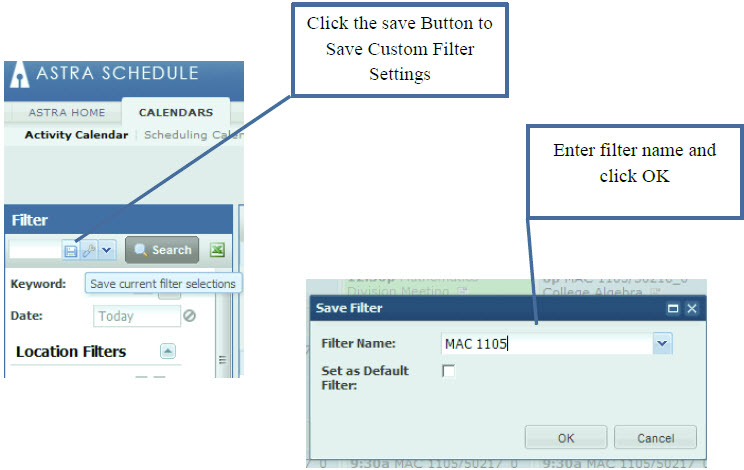
The saved filter toolbar is included at the top of the filter panel.
When filter selections are made, the saved filter tool will display "custom" to indicate that manual filtering is being applied. To save the filter selections:
- Select the filter options you would like to save in the filter panel.
- Click the save button in the saved filter toolbar.

- Enter a name for your saved filter.
-
Place a check in the box labeled "Set as Default Filter" if you would like the saved filter to be applied by default when visiting the page.
NOTE: If no default is specified, filtered lists will remember the last filter applied when returning to the page. - Click OK to save the filter.
The saved filter is now available for selection using the drop-down menu on the saved filter toolbar.
You may edit or remove saved filters using the manage filters option on the saved filter toolbar.
Exporting to Excel
To export to a spreadsheet, click the Excel icon in the upper right corner of the filter panel.
![]()
On the "open" dialog window, choose either "Open with" or "Save", and click OK.